If after following the instructions below, you are stuck and have purchased optional technical assistance (see details), please contact us for additional assistance.
If you are new to the AlphaPix controller, here is the recommended setup method:
Bare Controller - NOT pre-assembled / Ready2Run Kits
Ensure that AlphaPix controller is on a non-conductive / metal surface. Ideally, we recommend a mounting plate and enclosure (AlphaPix 16 / AlphaPix 4).
Connect your power supply to "BANK 1" power input- this should be the same voltage as the pixels connected.
With the power off, connect your pixels to the SPI output(s).
Make absolutely sure that no wires are shorted or touching.
We recommend connecting one string to start.
Make sure the direction (pixels are all directional) is correct - if you are unsure, check out website product page or your pixel configuration sheet shipped with your HolidayCoro pixels. Arrows should point away from the controller.
See the following video for wiring instructions:
Power up controller
PRE-Assembled / Ready2Run Controllers / Kits
Plug in pixels to waterproof plug
Power up controller
Test the Pixels
We know you are ready to get going but start by making sure that ALL your pixels work with the controller in hardware test mode first. Do not skip ahead and test or configure the PC sequencing application at this time.
To test pixels using the built-in hardware test mode, see these videos:
AlphaPix Evolution:
At main menu that is scrolling through menu options
Briefly press M button (S IS PRESSED HERE IN ERROR)
Display shows "1.SYSTEM SETUP"
Press S once
Display shows "DHCP-" and the status of DHCP (YES OR NO). Use + or - to move to the text "DHCP-NO"
Press S once
Display shows "STATIC IP" along with the static IP address
To move between octets (four of them seperated by periods) press the OK button
To change the number in the octet (0 to 255) use the + and - buttons
Once at the last octet, press OK and the cursor will move back to the first octet
Press the S button once and this will move to the subnet mask configuration
Display shows "SUBNET MASK" along with the subnet mast number
To move between octets (four of them seperated by periods) press the OK button
To change the number in the octet (0 to 255) use the + and - buttons
Once at the last octet, press OK and the cursor will move back to the first octet
Press the S button once and this will move to the subnet mask configuration
Display shows "PIXEL PROTOCOL"
If you are done with IP address configuration at this time, press the M button to save the settings
The controller will display "CONFIGURED REBOOTING NOW" and will reboot with the new settings in place
AlphaPix Classic:
Here are the instructions shown above:
Wait for controller to boot up (usually about 15 seconds)
Press and HOLD the "M" (1st from left) button until the LCD reads "Entering test mode"
Press the "+" and "-" buttons (3rd and 4th from left) to cycle through the different output modes
LCD will display the type of output that should appear on the pixels (Red, Green, Blue, Yellow, White, etc)
Press and hold the "M" button to exit the test mode, once test mode has been exited, the controller will display "NORMAL MODE"
Once ALL lights test out correctly and the colors listed on the LCD match those of the actual lights, proceed to the next step. If the lights do NOT light up, check the following:
Ensure that the lights are hooked up in the right direction. See our pixel configuration sheet for which direction is "IN" and "OUT" on your HolidayCoro pixels.
Ensure that the lights are the correct voltage for the controller power. If you have 5v pixels, make sure the controller power supply is 5v, etc.
If most of your outputs work but one or more do not work, see this troubleshooting video:
Configuring the IP address on the AlphaPix
How to configure a static IP address (or switch to/from DHCP mode) on an AlphaPix Evolution:
Setup the PC Network
Note that the following video shows setup on a Microsoft Windows environment. Your specific operating system may vary.
Setup your PC network:
Windows 7:
Windows 10:
DO NOT proceed until you are able to PING your controller as shown in the videos above.
Configure the Pixel Controller Settings Via Web Browser
This process configures the settings for your specific pixel configuration. As each controller configuration is often unique, the settings are unique to that controller and the pixel type, pixel count and number of pixel controllers in the display.
We recommend using Google Chrome for best results with your controller. There are known issues with selected versions of Internet Explorer and Safari.
This video walks through all the standard configuration parameters on the AlphaPix controller:
Need help understanding how a DMX universe/address is laid out and configured? See our chart at the bottom of this page.
Test the Output from the PC
If you are new to E1.31 controllers, we highly recommend starting by testing your pixel output using xLights.
This video shows the process to setup xLights outputs:
This video shows the process to test the output:
LOR S3 Users: If you have installed LOR S3 on your computer from which you are using xLights (or any other E1.31 application) you must unload the Control Panel application (system tray with a red or blue light bulb icon) by right clicking the icon and selecting "Unload Light-o-Rama". If this is not done, output from xLights will be interrupted and unpredictable.
Setup the E1.31 Application / Sequencing Application
NOTE: There are hundreds of possible applications on the market today that work with E1.31 and Artnet protocols but the following only shows some of the very common applications used by the holiday lighting community. Due to the rate of change in these applications and the quantity, it is not possible for us to provide specific advice on each application. Please contact your software vendor for assistant on setup of their application to work with our standards based controller.
Light-o-Rama Software
If you are using LOR S4 (S3 users should upgrade to S4), we recommend configuring the hardware output and then just a simple test sequence. We do not recommend trying to build an entire sequence to start with.
NOTE: If your configuration results in the LOR comm listener error "DMX listener error 3: Comm Winsock Error / 10061: Connection is forcefully rejected", this is a result of an issue within LOR S3 that assumes you must have an LOR "dongle" configured. As a result, you need to install the drivers for the dongle even if you do not have one. See this article for complete instructions.
If your controller is configured for universes 1 to 16, here is a useful test sequence for LOR S4 that outputs test data in an LOR sequence, to all channels - download link
Setup video:
xLights 2017
Note that xLights is an open source application and as a result, updates to the application are very common and this can result in a different application than shown on the video below.
Q: When I test the output from my controller using the built-in hardware test and/or my sequencing application, the colors don't come out correct - how do I fix that? A: While we mostly refer to lights as "RGB" and assume they are always in that order of Red, Green then Blue, the reality is that they are often in different orders. There are two settings that can change the order on your AlphaPix:
"Color Order Output from Application" - This should be set to the color order your application expects the pixels to be in. In nearly all cases this will be "RGB".
"Pixel Chip Color Order" - This should be set to the color output order of the specific pixels you are using. For example, if you using our #700 pixel strip, the order should be BRG.
This video shows the above process and how to also configure per-output color order settings:
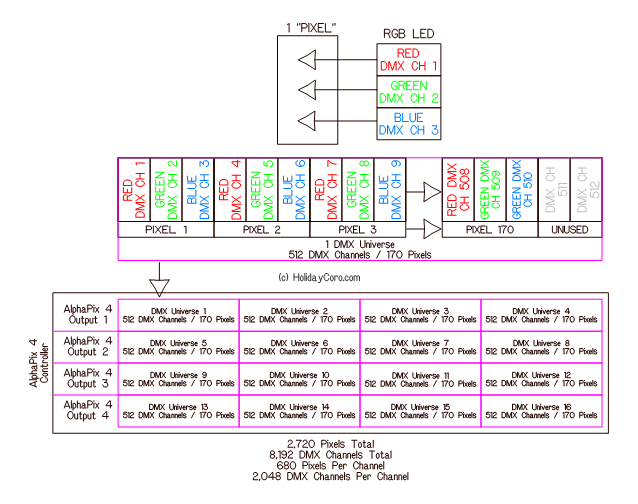
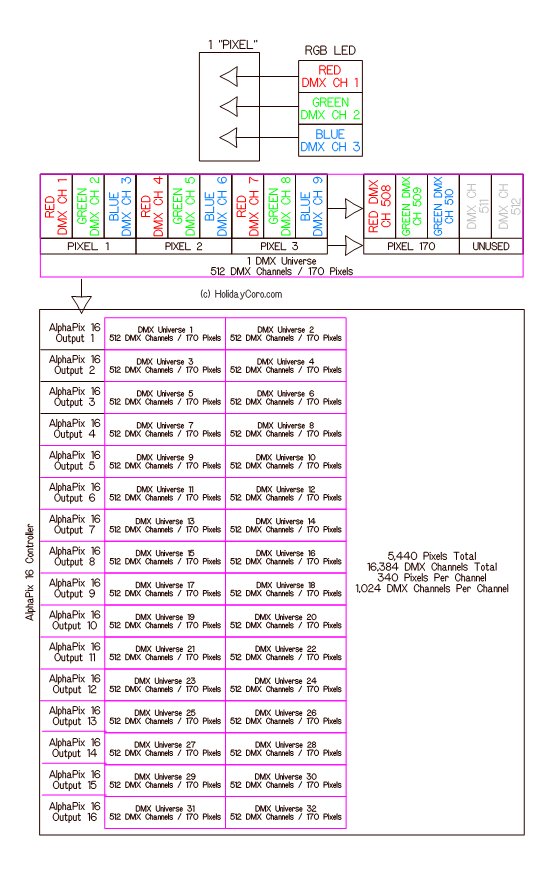
Q: Do you have a diagram that helps me better understand the relationship between DMX Channels, DMX Universes and SPI Outputs? A: Yes, we have a diagram for both the AlphaPix 4 and Alpha 16 that show how DMX Channels and DMX Universes are arranged inside the controller addressing:
AlphaPix 4:
AlphaPix 16: Q: What do the three status lights on the board mean and/or what do the green and orange status lights on the Ethernet (CAT5) jack mean? A: There are 5 status lights on the AlphaPix controllers. The following tables list the functions of these lights: System Board Status Lights (Firmware V1.02+)
LED 3
(Green)
LED 2
(Green)
LED 1
(Red)
Condition / Function / Mode
Off
Off
Flashing
Normal operation
Not in test mode - Ready to receive E1.31 / Artnet Data
On
Off
Flashing
Normal Operation
In test mode - Will not respond to E1.31 / Artnet Data
Network Jack Status Lights (Instructiosn are also printed on PCB)
Link LED
(Green)
Data LED
(Yellow)
Condition
Solid
Rapid Flashing
Connected to network, receiving/sending data ok
Solid
Off
Connected to network, NOT receiving or sending data
Off
Off
Power on controller is off or cable is not plugged into a valid Ethernet network port/switch
Q: What test modes / built-in sequences are in the controller? A: The AlphaPix controllers have a variety of test modes which are great for burn-in, finding bad pixels or off-season uses. The following table lists all these modes:
Mode #
Color / Function
1
Black / Off
(useful for checking for stuck pixels)
2
Static Red
3
Static Green
4
Static Blue
5
Static Yellow
6
Static Purple
7
Static Cyan
8
Static White
(useful for checking for bad RGB lights)
9
Red > Green > Blue Changing
10
General Color Changing
11
Red Meteor Chase
12
Green Meteor Chase
13
Blue Meteor Chase
14
General Color Changing
15
Green > Red Chase
16
Red > Green Chase
17
Red > White > Blue Chase
18
Yellow > Purple Chase
19
Purple > Yellow Chase
20
Red > White Chase
21
Blue > White Chase
22
Green > White Chase
23
Purple > Yellow Flashing
24
Yellow > Purple Flashing
Video
Common Soon - Video showing each mode
Q: I have a suggestion for an improvement to the firmware (software) or hardware - how can I do that? A: We love feedback from our customers and you can find current suggestions planned or suggested on our firmware page.
Q: I'd like to purchase spare or replacement plugs used for the pixel outputs for the AlphaPix 16 - where can I find those? A: If you need additional plugs, they can be purchased at DigiKey.
Q: I'm unable to get output to my pixels and I have verified that the pixels have the right power and the test mode doesn't work. A: It is not common but in selected cases, when pixels are incorrectly connected or shorted out, the output chip can become damaged. The output chip is in a removable socket in the controller (chips U7 - U10) to allow for it to be replaced in the field. When replacing the chip, note the text on the PCB that says "DIRECTION OF NOTCH/PIN". The chip can be purchased here.
Q: How do I factory re-set my AlphaPix controller? A: Yes, the firmware can be factory loaded. See the firmware page.
Q: I broke off / shorted / damaged my power input connector, where can I find a replacement? A: Replacements can be purchased Here. Please note that we do not support the customer repair of controllers.